Employee Dashboard Overview
Your Perkspe dashboard is the central hub where you can see all your benefits, expenses, and rewards at a glance. This is your first stop every time you log in.
Dashboard Components
1. Welcome Section
What You See:
- Personalized greeting with your name
- Current date and time
- Quick status indicators
Why It Matters:
- Confirms you're logged into the correct account
- Shows real-time system status
- Your starting point for daily activity
2. Your Expenses Summary
One of the most important sections showing the status of all your submitted expenses.
Three Key Metrics:
Approved / Reimbursed 💳
- Expenses that have been fully approved and reimbursed
- Money already sent to your bank account
- Example: ₹5,000
Pending ⏳
- Expenses submitted but still awaiting manager review
- Action may be required from you (if manager requests clarification)
- Example: ₹2,500
Rejected ❌
- Expenses that didn't meet policy requirements
- Can be edited and resubmitted
- Example: ₹0 (hopefully!)
Tip: The total here equals all your submissions. Add them up to verify.
3. Your Coins Balance
Balance Coins 🟡
- Available PEP Coins you can redeem for rewards
- Updated in real-time as you submit expenses
- Example: 150 coins
Redeemed Coins ✅
- Total coins you've already used for rewards
- Historical record of your redemptions
- Example: 50 coins
What to Do:
- Monitor your balance regularly
- Redeem before coins expire
- Go to Perks section in sidebar to redeem coins
4. Recent Activity
Shows your most recent actions (if available):
- Last submitted expense and status
- Last card transaction (if using RuPay card)
- Recent notifications or updates
Navigation Sidebar
The left sidebar provides quick access to all features:
Main Menu Items:
| Menu | Function |
|---|---|
| Home | Returns to dashboard (where you are now) |
| Expenses | Submit and track expenses |
| ↳ My Expenses | View list of all your submissions with status, filters, and detailed information |
| ↳ Cash Advance | Request and track advance |
| Settings | Manage your profile and preferences |
| Sign Out | Safely logout from your account |
Reading Dashboard Metrics
Understanding Your Expense Status
Total Submitted = Approved + Pending + Rejected
Example Dashboard:
- Approved: ₹5,000 ✅
- Pending: ₹2,000 ⏳
- Rejected: ₹500 ❌
- Total Submitted: ₹7,500
What Each Status Means:
Approved/Reimbursed ✅
- ☑️ Manager reviewed and approved
- ☑️ Meets company policy
- ☑️ Finance team processed
- ☑️ Money transferred to your bank
- ⏱️ Timeline: 8-12 days from submission
Pending ⏳
- ⏳ Still under manager review
- ⏳ Waiting for clarification (maybe)
- ⏳ No action needed unless manager comments
- ⏱️ Typical wait: 1-5 business days
Rejected ❌
- ❌ Doesn't meet policy requirements
- ❌ May need revision and resubmission
- ❌ Manager provided reason in comments
- ✍️ Action: Edit and resubmit
Dashboard Actions
Quick Actions Available from Dashboard:
Submit New Expense
- Click + New Expense button
- See Expenses Introduction for detailed steps
View All Expenses
- Click View My Expenses or My Expenses in sidebar
- See full list with filters and search
Check Perks Balance
- Click Perks in sidebar
- See all allocated perks and remaining balance
Manage Coins
- Click Perks → Coins section
- View coin balance and redemption options
Dashboard Tips & Tricks
Regular Checks
Daily: No daily action needed, but you can:
- ☑️ Check if new notifications arrived
- ☑️ Verify your total pending is accurate
Weekly:
- ☑️ Submit any pending expenses in your list
- ☑️ Check if manager commented on prior submissions
- ☑️ Review pending approval status
Monthly:
- ☑️ Review total monthly spending
- ☑️ Check coin balance and expiry dates
- ☑️ Plan future expense submissions
- ☑️ Look at approved vs. rejected ratio
Using Dashboard for Planning
Expense Management:
- High pending amount? Don't submit more until reviewed
- High rejected amount? Review why and prevent future rejections
- Approved increasing? You're doing it right!
Coin Tracking:
- Monitor balance to avoid letting coins expire
- Plan redemptions before expiry date
- Track progress toward higher-value rewards
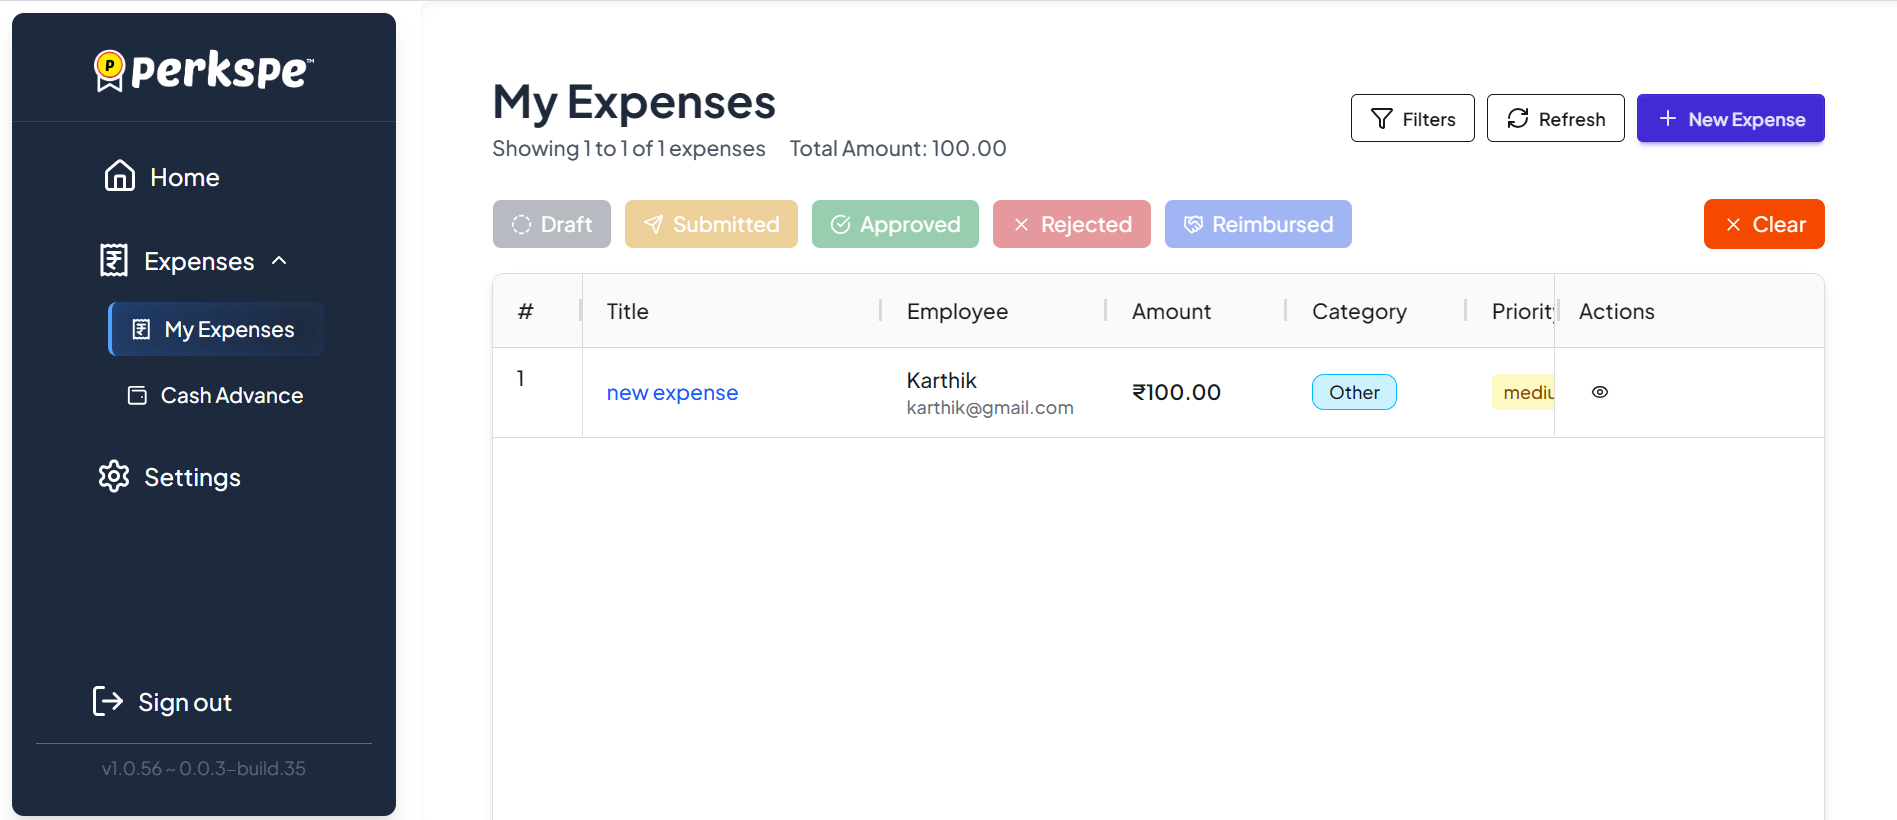
My Expenses Overview
Access your complete expense history in the My Expenses section from the Expenses menu in the sidebar.
Viewing Your Expenses:
Expense Status Tabs:
- Draft - Expenses you haven't submitted yet (still being prepared)
- Submitted - Awaiting manager/approver review
- Approved - Verified and pending reimbursement
- Rejected - Returned for correction or clarification
- Reimbursed - Successfully paid to your bank account
Tools Available:
| Tool | Purpose |
|---|---|
| Filters | Filter expenses by status, date, amount, or category |
| Refresh | Update the list to see latest changes |
| + New Expense | Quick button to submit a new expense |
| Clear | Reset all active filters |
Expense Details You'll See:
- # - Expense ID number
- Title - Description of the expense
- Employee - Your name and email
- Amount - Cost in rupees (₹)
- Category - Type (Travel, Food, Medical, Other, etc.)
- Priority - Importance level (Low/Medium/High)
- Actions - View, Edit, or Delete options
Quick Tips:
- Use filters to find specific expenses quickly
- Check "Submitted" tab to see pending approvals
- Draft saved expenses are automatically stored
- Rejected? Update the information and resubmit
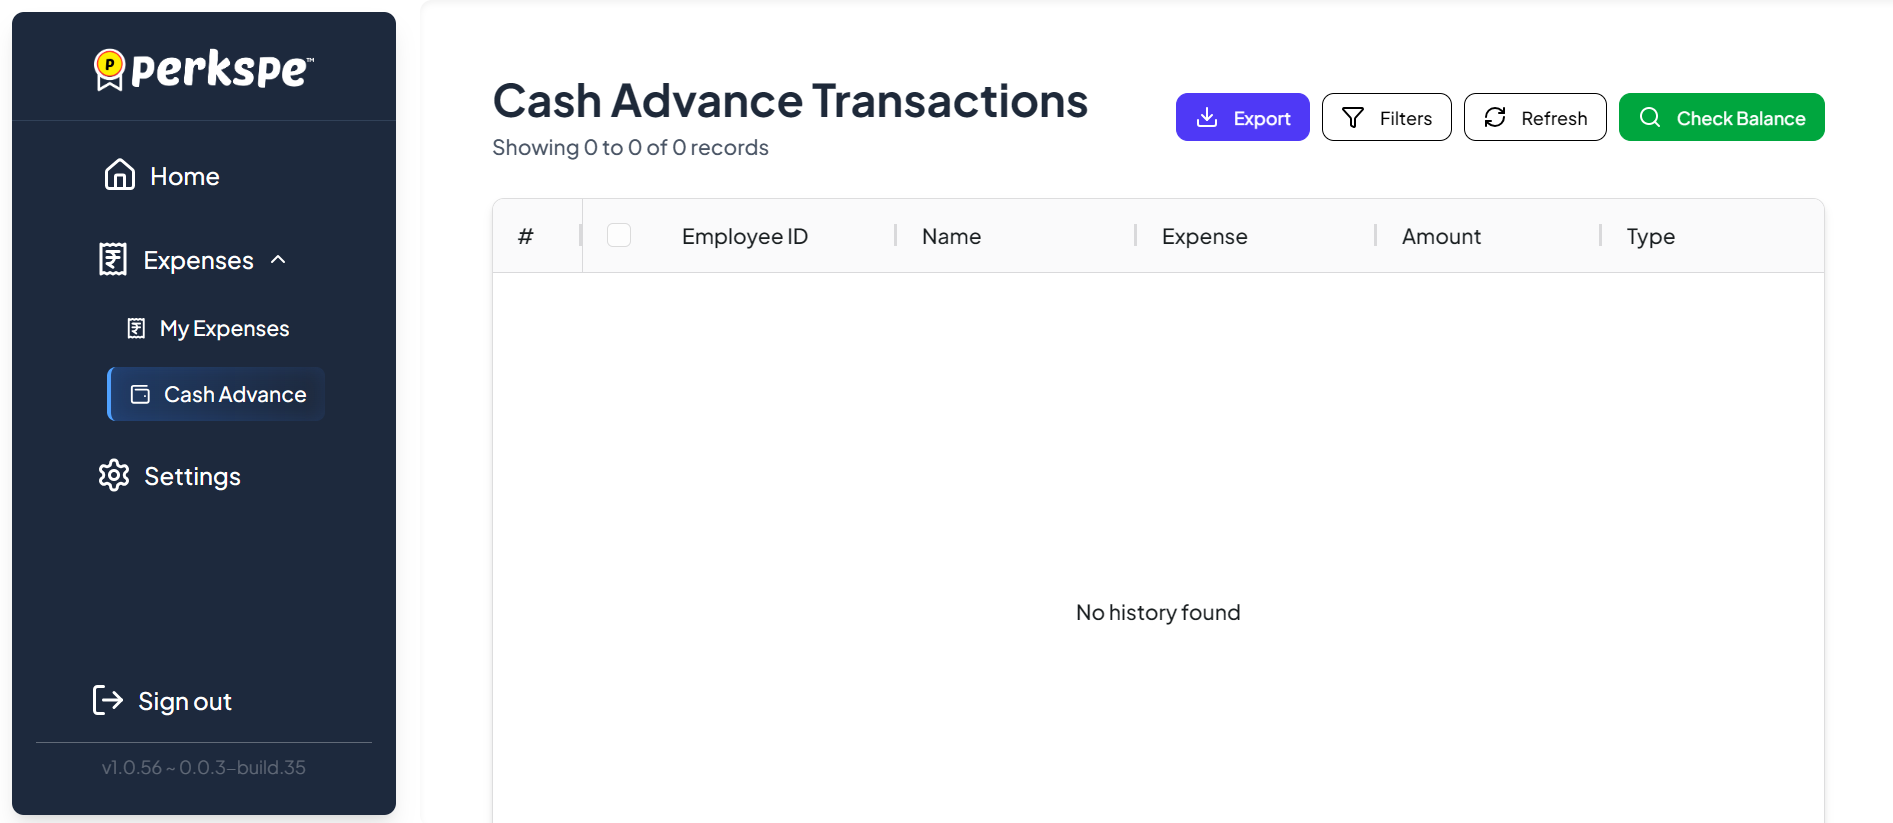
Cash Advance Transactions
Manage advance payment requests in the Cash Advance section under Expenses.
What You'll See:
Transaction Details:
- Employee ID - Your unique identifier
- Name - Your full name
- Expense - Associated expense category for the advance
- Amount - Cash advance amount received
- Type - Transaction classification
Available Tools:
| Tool | Purpose |
|---|---|
| Export | Download your transaction history as a file |
| Filters | Search by date, amount, or status |
| Refresh | Update transaction list with latest data |
| Check Balance | View remaining cash advance available to you |
Understanding the Display:
- "Showing 0 of 0 of 0 records" - You haven't requested any advances yet
- "No history found" - No advance transactions are recorded in the system
- Transactions appear here only after the advance has been processed
When to Use Cash Advance:
- Before a big trip or project requiring upfront spending
- When you need funds before expense reimbursement
- For business purchases that can't be done on personal funds
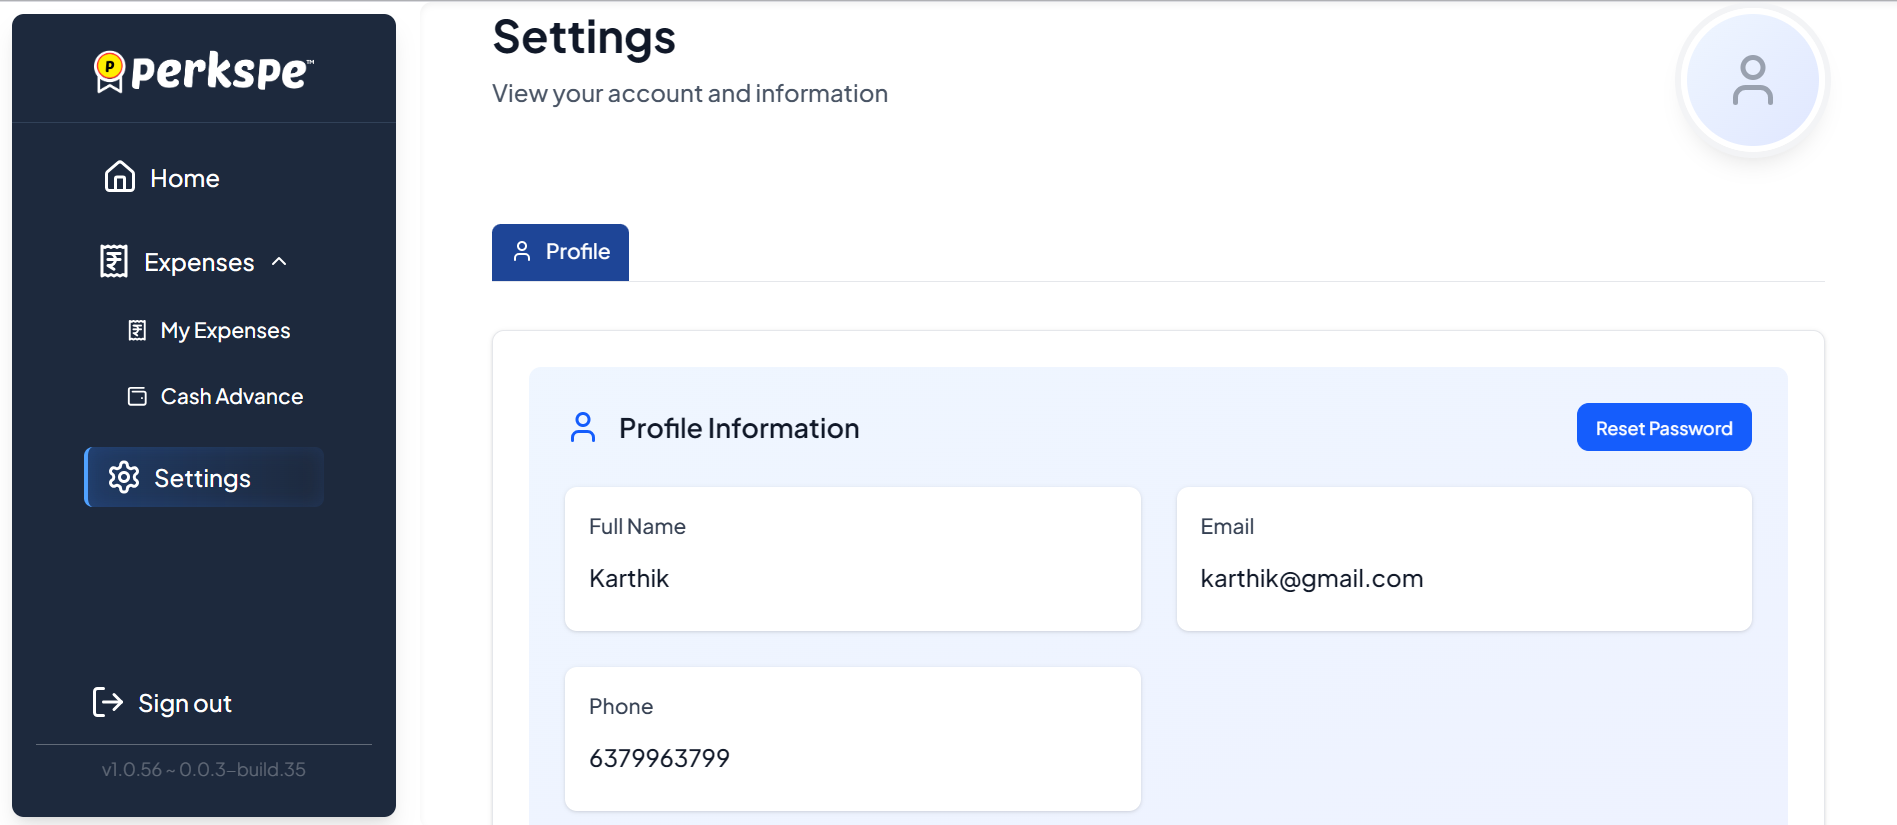
Settings & Profile
Manage your account information by clicking Settings in the sidebar.
Profile Information Section:
Your Details:
- Full Name - Your registered name in the system
- Email - Your contact email (usually company email)
- Phone - Your contact mobile number
- Reset Password - Secure button to change your login password
How to Update Your Information:
- Go to Settings from the sidebar
- Choose Profile tab
- View your current information
- Contact HR admin to update name, email, or phone (you can't self-edit)
- Click Reset Password to change your password anytime
Important Security Tips:
- Update your password periodically for security
- If email is incorrect, contact HR admin immediately
- Keep your phone number current for notifications
- Never share your password with anyone